가상머신 통합 기능은 베타 단계이며 기본적으로 활성화돼 있지 않다. 그러므로 IstioOperator 정의를 사용해 이스티오 설치를 업데이트해야 한다. IstioOperator 정의는 워크로드 자동 등록, 헬스 체크, DNS 쿼리를 캡처해 DNS 프록시로 리다이렉트하는 기능을 활성화한다. 이 기능들은 가상머신을 메시로 통합하는 데 필요하다.
# 컨트롤 플레인 업데이트 Mesh expansion to VMs
cat istio-in-action/book-source-code-master/ch13/controlplane/cluster-in-west-network-with-vm-features.yaml
apiVersion: install.istio.io/v1alpha1
kind: IstioOperator
metadata:
  name: istio-controlplane
  namespace: istio-system
spec:
  profile: demo
  components:
    egressGateways:
    - name: istio-egressgateway
      enabled: false
  meshConfig:
    defaultConfig:
      proxyMetadata:
        ISTIO_META_DNS_CAPTURE: "true" # DNS 쿼리가 캡처돼 DNS 프록시로 리다이렉트된다
  values:
    pilot:
      env:
        PILOT_ENABLE_WORKLOAD_ENTRY_AUTOREGISTRATION: true # 워크로드를 컨트롤 플레인에 자동 등록할 수 있다
        PILOT_ENABLE_WORKLOAD_ENTRY_HEALTHCHECKS: true # 가상머신 워크로드의 상태를 검사한다
    global:
      meshID: usmesh
      multiCluster:
        clusterName: west-cluster
      network: west-network
(⎈|default:N/A) root@k3s-s:~# istioctl install -f istio-in-action/book-source-code-master/ch13/controlplane/cluster-in-west-network-with-vm-features.yaml --set values.global.proxy.privileged=true -y
✔ Istio core installed
✔ Istiod installed
✔ Ingress gateways installed
✔ Installation complete Making this installation the default for injection and validation.
Thank you for installing Istio 1.17. Please take a few minutes to tell us about your install/upgrade experience! https://forms.gle/hMHGiwZHPU7UQRWe9
(⎈|default:N/A) root@k3s-s:~# kubectl patch svc istio-ingressgateway -n istio-system -p '{"spec": {"type": "NodePort"}}'
service/istio-ingressgateway patched
업데이트된 컨트롤 플레인은 DNS 해석을 위해 서비스 프록시가 DNS 쿼리를 포착해서 사이드카에 있는 로컬 DNS 프록시로 리다이텍트하도록 설정한다. 워크로드는 자동으로 등록할 수 있고 헬스 체크를 수행해 istiod에 보고할 수 있도록 업데이트 되었다. 이 기능들을 사용하려면 한 가지 조건이 더 있다. 가상머신은 istiod에 연결해 설정과 ID를 받아올 수 있어야 한다.
1️⃣ istiod와 클러스터 서비스들을 가상머신에 노출
가상머신이 메시의 일부분이 되려면 istiod에 통신을 하고 클러스터 서비스들과 커넥션을 시작할 수 있어야 한다. 가상머신과 클러스터가 같은 네트워크에 있을 때는 기본적으로 동작한다. 그렇지만 우리의 경우에는 별개의 네트워크에 있으므로 트래픽을 이스티오의 컨트롤 플레인이나 워크로드로 프록시해줄 east-west 게이트웨이가 필요하다. east-west 게이트웨이 설치해보자.
# cat istio-in-action/book-source-code-master/ch13/gateways/cluster-east-west-gw.yaml
apiVersion: install.istio.io/v1alpha1
kind: IstioOperator
metadata:
  name: istio-eastwestgateway
  namespace: istio-system
spec:
  profile: empty
  components:
    ingressGateways:
    - name: istio-eastwestgateway
      label:
        istio: eastwestgateway
        app: istio-eastwestgateway
        topology.istio.io/network: west-network
      enabled: true
      k8s:
        env:
        - name: ISTIO_META_ROUTER_MODE
          value: "sni-dnat"
        # The network to which traffic is routed
        - name: ISTIO_META_REQUESTED_NETWORK_VIEW
          value: west-network
        service:
          ports:
          - name: status-port
            port: 15021
            targetPort: 15021
          - name: mtls
            port: 15443
            targetPort: 15443
          - name: tcp-istiod
            port: 15012
            targetPort: 15012
          - name: tcp-webhook
            port: 15017
            targetPort: 15017
  values:
    global:
      meshID: usmesh
      multiCluster:
        clusterName: west-cluster
      network: west-network
(⎈|default:N/A) root@k3s-s:~# istioctl install -f istio-in-action/book-source-code-master/ch13/gateways/cluster-east-west-gw.yaml -y
✔ Ingress gateways installed
✔ Installation complete
Thank you for installing Istio 1.17. Please take a few minutes to tell us about your install/upgrade experience! https://forms.gle/hMHGiwZHPU7UQRWe9
(⎈|default:N/A) root@k3s-s:~# kubectl get pod -n istio-system -l chart=gateways
NAME READY STATUS RESTARTS AGE
istio-eastwestgateway-86f6cb4699-hmvxx 1/1 Running 0 43s
istio-ingressgateway-7b7ccd6454-ss2jw 1/1 Running 0 6m23s
(⎈|default:N/A) root@k3s-s:~# kubectl get svc -n istio-system -l istio.io/rev=default
NAME TYPE CLUSTER-IP EXTERNAL-IP PORT(S) AGE
istio-eastwestgateway LoadBalancer 10.10.200.76 192.168.10.10 15021:30583/TCP,15443:32138/TCP,15012:31673/TCP,15017:32444/TCP 56s
istio-ingressgateway NodePort 10.10.200.56 <none> 15021:32314/TCP,80:30000/TCP,443:30005/TCP,31400:30327/TCP,15443:30693/TCP 9h
istiod ClusterIP 10.10.200.160 <none> 15010/TCP,15012/TCP,443/TCP,15014/TCP 9h
게이트웨이를 설치하면 가상머신이 클러스터 서비스와 istiod에 접근하는 데 필요한 포트를 노출할 수 있다.
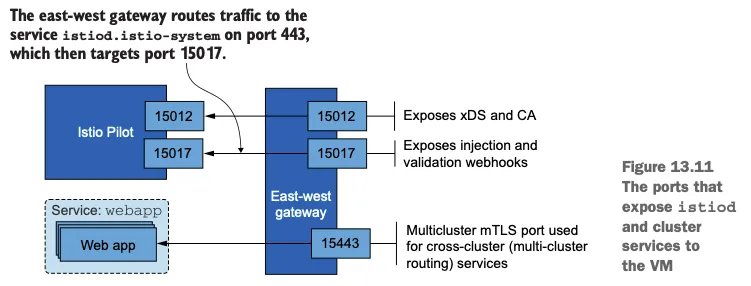
위 그림은 가상머신이 istiod와 클러스터 서비스들에 연결할 수 있도록 노출된 포트를 보여준다. 먼저 가상머신에서 메시 내 서비스로 향하는 요청을 리버스 프록시해주는 다중 클러스터 상호 TLS 포트(15443)을 노출해보자.
# cat istio-in-action/book-source-code-master/ch13/expose-services.yaml
apiVersion: networking.istio.io/v1alpha3
kind: Gateway
metadata:
  name: cross-network-gateway
  namespace: istio-system
spec:
  selector:
    istio: eastwestgateway
  servers:
    - port:
        number: 15443
        name: tls
        protocol: TLS
      tls:
        mode: AUTO_PASSTHROUGH
      hosts:
        - "*.local"
(⎈|default:N/A) root@k3s-s:~# kubectl apply -f istio-in-action/book-source-code-master/ch13/expose-services.yaml
gateway.networking.istio.io/cross-network-gateway created
(⎈|default:N/A) root@k3s-s:~# kubectl get gw,vs -A
NAMESPACE NAME AGE
istio-system gateway.networking.istio.io/cross-network-gateway 12s
istioinaction gateway.networking.istio.io/coolstore-gateway 9h
NAMESPACE NAME GATEWAYS HOSTS AGE
istioinaction virtualservice.networking.istio.io/webapp-virtualservice ["coolstore-gateway"] ["webapp.istioinaction.io"] 9h
다음으로는 트래픽을 허용하고 istiod로 라우팅하도록 Gateway 리소스와 VirtualService 리소스를 적용해 istiod 포트를 노출한다.
# cat istio-in-action/book-source-code-master/ch13/expose-istiod.yaml
apiVersion: networking.istio.io/v1alpha3
kind: Gateway
metadata:
  name: istiod-gateway
spec:
  selector:
    istio: eastwestgateway
  servers:
    - port:
        name: tls-istiod
        number: 15012
        protocol: tls
      tls:
        mode: PASSTHROUGH
      hosts:
        - "*"
    - port:
        name: tls-istiodwebhook
        number: 15017
        protocol: tls
      tls:
        mode: PASSTHROUGH
      hosts:
        - "*"
---
apiVersion: networking.istio.io/v1alpha3
kind: VirtualService
metadata:
  name: istiod-vs
spec:
  hosts:
  - "*"
  gateways:
  - istiod-gateway
  tls:
  - match:
    - port: 15012
      sniHosts:
      - "*"
    route:
    - destination:
        host: istiod.istio-system.svc.cluster.local
        port:
          number: 15012
  - match:
    - port: 15017
      sniHosts:
      - "*"
    route:
    - destination:
        host: istiod.istio-system.svc.cluster.local
        port:
          number: 443
(⎈|default:N/A) root@k3s-s:~# kubectl apply -f istio-in-action/book-source-code-master/ch13/expose-istiod.yaml -n istio-system
gateway.networking.istio.io/istiod-gateway created
virtualservice.networking.istio.io/istiod-vs created
(⎈|default:N/A) root@k3s-s:~# kc get gw,vs -A
NAMESPACE NAME AGE
istio-system gateway.networking.istio.io/cross-network-gateway 103s
istio-system gateway.networking.istio.io/istiod-gateway 12s
istioinaction gateway.networking.istio.io/coolstore-gateway 9h
NAMESPACE NAME GATEWAYS HOSTS AGE
istio-system virtualservice.networking.istio.io/istiod-vs ["istiod-gateway"] ["*"] 12s
istioinaction virtualservice.networking.istio.io/webapp-virtualservice ["coolstore-gateway"] ["webapp.istioinaction.io"] 9h
인프라를 만들고, 컨트롤 플레인을 업데이트하고, 프록시가 컨트롤 플레인에 통신할 수 있도록 준비하면서 가상머신을 서비스 메시에 통합하기 위해 먼 길을 걸어왔다. 이제 가상머신이 속해 있는 워크로드 그룹을 나타내는 WorkloadGroup 을 만드는 것만 남았다.
2️⃣ WorkloadGroup으로 워크로드 그룹 나타내기
WorkloadGroup은 구성원인 가상머신들의 공통 속성을 정의하는데, 여기서는 노출할 포트, 애플리케이션이 트래픽을 받을 준비가 됐는지 테스트할 방법 같은 애플리케이션 전용 정보 등이 있다. 예를 들어 forum 워크로드의 공통 속성은 다음 WorkloadGroup에서 정의한다.
# cat istio-in-action/book-source-code-master/ch13/workloadgroup.yaml
apiVersion: networking.istio.io/v1alpha3
kind: WorkloadGroup
metadata:
  name: forum
  namespace: forum-services
spec:
  metadata:
    annotations: {}
    labels:
      app: forum # 서비스는 레이블을 사용해 이 그룹의 워크로드를 대상으로 삼을 수 있다
  template:
    serviceAccount: forum-sa # 워크로드가 이 워크로드 그룹에 등록하려면 forum-sa 인증 토큰을 보유하고 있어야 한다
    network: vm-network # 이스티오가 동일한 네트워크에 있는 워크로드 사이의 직접 접근을 설정할 수 있도록 한다
  probe: # 이 워크로드 그룹의 인스턴스에서 실행되는 istio-agent는 HTTP GET 요청을 8080 포트의 /api/healthz 경로로 보내 앱의 준비 상태를 확인한다
    periodSeconds: 5
    initialDelaySeconds: 1
    httpGet:
      port: 8080
      path: /api/healthz
가상머신을 서비스 메시에 통합하기 위한 관련 속성 일부는 다음과 같다.
1) labels
- 쿠버네티스 서비스들이 이 워크로드 그룹으로 등록된 워크로드 엔트리를 선택할 수 있게 해준다.
2) network
- 컨트롤 플레인이 이 속성을 사용해 트래픽을 가상머신으로 라우팅하도록 서비스 프록시를 설정한다.
- 같은 네트워크에 있으면 IP 주소를 사용한다. 다른 네트워크라면 그 네트워크에 배포된 east-west 게이트웨이를 사용한다.
3) serviceAccount
- 워크로드의 ID를 나타낸다. 워크로드가 이 그룹의 멤버로 등록하려면, 이 서비스 어카운트 ID용 클레임을 제시해야 한다.
네임스페이스와 서비스 어카운트를 만들고 WorkloadGroup 설정을 클러스터에 적용해보자.
(⎈|default:N/A) root@k3s-s:~# kubectl create namespace forum-services
namespace/forum-services created

(⎈|default:N/A) root@k3s-s:~# kubectl create serviceaccount forum-sa -n forum-services
serviceaccount/forum-sa created

(⎈|default:N/A) root@k3s-s:~# kubectl apply -f istio-in-action/book-source-code-master/ch13/workloadgroup.yaml
workloadgroup.networking.istio.io/forum created

(⎈|default:N/A) root@k3s-s:~# kubectl get-all -n forum-services
NAME                                     NAMESPACE       AGE
configmap/istio-ca-root-cert             forum-services  38s
configmap/kube-root-ca.crt               forum-services  38s
serviceaccount/default                   forum-services  38s
serviceaccount/forum-sa                  forum-services  26s
workloadgroup.networking.istio.io/forum  forum-services  11s

(⎈|default:N/A) root@k3s-s:~# kubectl get workloadgroup -n forum-services
NAME    AGE
forum   22s
WorkloadGroup 을 적용하면 클러스터는 WorkloadGroup에 명세된 forum-sa 서비스 어카운트의 유효한 토큰을 제시할 수 있는 워크로드를 자동으로 등록하도록 설정된다.
✔️ 가상머신의 사이드카용 설정 생성
WorkloadGroup 은 워크로드 자동 등록을 가능하게 하는 것 외에, 이 그룹에 있는 가상머신을 위한 공통 설정을 생성하는 데도 사용할 수 있다. istioctl 을 사용하면 가상머신 설정을 만드는 것이 매우 간단하다. istioctl 은 WorkloadGroup 안의 정보를 사용하고, WorkloadGroup 인스턴스용 설정을 생성하는 데 필요한 추가 정보는 쿠버네티스 클러스터에 쿼리한다. 예를 들어 다음 명령어는 forum 워크로드를 호스팅하는 머신용 설정을 생성한다.
istioctl x workload entry configure \
--name forum \ # forum-services 네임스페이스에 있는 forum WorkloadGroup 을 읽고 워크로드 설정을 생성한다
--namespace forum-services \ # 상동
--clusterID "west-cluster" \ # 반드시 이스티오 설치 시 지정한 클러스터 이름으로 설정해야 한다
--externalIP $VM_IP \ # 워크로드가 클러스터와 동일한 네트워크에 있지 않은 경우 workloadIP 파라미터가 필요하다. 디폴트 설정에 의하면, 정의하지 않은 경우 네트워크에서 할당한 사설 IP를 사용한다.
--autoregister \ # 워크로드를 자동으로 등록하도록 설정한다.
-o /tmp/my-workload-files/ # 설정 파일을 저장할 디렉터리 위치를 명령 실행 위치에 대한 상대 경로로 지정한다.

(⎈|default:N/A) root@k3s-s:~# istioctl x workload entry configure -f istio-in-action/book-source-code-master/ch13/workloadgroup.yaml -o /tmp/my-workload-files/ --clusterID "west-cluster" --autoregister
Warning: a security token for namespace "forum-services" and service account "forum-sa" has been generated and stored at "/tmp/my-workload-files/istio-token"
Configuration generation into directory /tmp/my-workload-files/ was successful

(⎈|default:N/A) root@k3s-s:~# cat /tmp/my-workload-files/hosts
192.168.10.10 istiod.istio-system.svc

(⎈|default:N/A) root@k3s-s:~# chown ubuntu:ubuntu -R /tmp/my-workload-files/
(⎈|default:N/A) root@k3s-s:~# tree /tmp/my-workload-files/
/tmp/my-workload-files/
├── cluster.env
├── hosts
├── istio-token
├── mesh.yaml
└── root-cert.pem
생성된 설정을 살펴보면 다양한 구성 요소가 동작 중임을 확인할 수 있다. 고수준에서 알아야 할 중요한 사실은 파일에 다음이 포함돼 있다는 점이다.
1) east-west 게이트웨이 IP 주소
- 여기를 통해 istiod가 노출된다.
2) 루트 인증서
- istiod가 제시한 인증서의 진위를 검증하는 데 사용한다. 인증서 검증은 서비스 프록시와 istiod 사이의 보안 커넥션을 시작하기 전에 수행해야 하는 선행 작업이다.
3) 서비스 어카운트 토큰
- istiod에게 forum WorkloadGroup의 구성원임을 인증하는 데 사용
4) 서비스 메시
- 네트워크, 공통 속성에 대한 설정. WorkloadGroup에 정의된 대로다.
이 설정이 있으면 서비스 프록시는 컨트롤 플레인에 보안 커넥션을 시작하고, 자신의 SVID를 가져오고, xDS로 엔보이 설정을 수신해 메시의 구성원이 될 수 있다.
✔️ 생성된 파일을 가상머신으로 전송
설정 파일에는 민감 정보, 구체적으로는 서비스 어카운트 토큰이 포함되 있으므로 가상머신으로 안전하게 전송해야 한다. 시연을 위해 공수가 제일 적은 방법을 사용해 파일을 SSH를 통해 복사할 것이다. 이 방법은 안전하지만, 운영 환경에서는 당연히 이 과정이 자동화되어 수작업이 필요 없어야 한다.
k3s -> local -> vm
## 윈도우 기준 키가 필요하므로 아래 방법을 따르도록
# k3s -> local
PS C:\CODE\AWS\key> scp -i ./pandayh7DevOps.pem ubuntu@3.35.134.140:/tmp/my-workload-files/*  ./my-workload-files
cluster.env                                                                           100%  635    32.6KB/s   00:00
hosts                                                                                 100%   38     2.0KB/s   00:00
istio-token                                                                           100%  844    45.8KB/s   00:00
mesh.yaml                                                                             100%  792    36.8KB/s   00:00
root-cert.pem                                                                         100% 1094    56.2KB/s   00:00

# local -> vm
PS C:\CODE\AWS\key> scp -i ./pandayh7DevOps.pem ./my-workload-files/cluster.env ubuntu@54.180.136.98:/tmp/
The authenticity of host '54.180.136.98 (54.180.136.98)' can't be established.
ED25519 key fingerprint is SHA256:SYsng08m2+T9/7ihTvA6tXMEaaY9FMr8K5IoegDhk5Y.
This host key is known by the following other names/addresses:
    C:\Users\****/.ssh/known_hosts:103: ec2-3-39-224-174.ap-northeast-2.compute.amazonaws.com
    C:\Users\****/.ssh/known_hosts:106: ec2-54-180-136-98.ap-northeast-2.compute.amazonaws.com
Are you sure you want to continue connecting (yes/no/[fingerprint])?		# yes 입력
Warning: Permanently added '54.180.136.98' (ED25519) to the list of known hosts.
cluster.env                                                                           100%  635    31.0KB/s   00:00

PS C:\CODE\AWS\key> scp -i ./pandayh7DevOps.pem ./my-workload-files/istio-token ubuntu@54.180.136.98:/tmp/
istio-token                                                                           100%  844    27.5KB/s   00:00

PS C:\CODE\AWS\key> scp -i ./pandayh7DevOps.pem ./my-workload-files/mesh.yaml ubuntu@54.180.136.98:/tmp/
mesh.yaml                                                                             100%  792    38.7KB/s   00:00

PS C:\CODE\AWS\key> scp -i ./pandayh7DevOps.pem ./my-workload-files/root-cert.pem ubuntu@54.180.136.98:/tmp/
root-cert.pem                                                                         100% 1094    53.4KB/s   00:00
# vm
root@forum-vm:~# ls -l /tmp
total 36
-rw-rw-r-- 1 ubuntu ubuntu 635 May 31 03:32 cluster.env
-rw-rw-r-- 1 ubuntu ubuntu 844 May 31 03:32 istio-token
-rw-rw-r-- 1 ubuntu ubuntu 792 May 31 03:32 mesh.yaml
-rw-rw-r-- 1 ubuntu ubuntu 1094 May 31 03:33 root-cert.pem
...
이제 파일이 가상머신으로 복사됐으므로, 사이드카가 서비스 메시에 참가하도록 설치하고 설정할 준비가 됐다.
3️⃣ 가상머신에 istio-agent 설치 및 설정
forum-vm 가상머신에 istio-agent 를 다운로드하고 설치할 차례다.
root@forum-vm:~# cat /etc/resolv.conf
nameserver 127.0.0.53
...

root@forum-vm:~# ss -tnlp
State    Recv-Q   Send-Q     Local Address:Port       Peer Address:Port   Process
...
LISTEN   0        4096       127.0.0.53%lo:53              0.0.0.0:*       users:(("systemd-resolve",pid=326,fd=14))
...

root@forum-vm:~# ss -unlp
State   Recv-Q  Send-Q           Local Address:Port     Peer Address:Port  Process
UNCONN  0       0                127.0.0.53%lo:53            0.0.0.0:*      users:(("systemd-resolve",pid=326,fd=13))
...

root@forum-vm:~# resolvectl status
Global
       Protocols: -LLMNR -mDNS -DNSOverTLS DNSSEC=no/unsupported
# 127.0.0.53(local stub resolver)을 가리키며, systemd-resolved가 이 요청을 처리함
resolv.conf mode: stub			# 상태 확인 필요

Link 2 (ens5)
    Current Scopes: DNS
         Protocols: +DefaultRoute +LLMNR -mDNS -DNSOverTLS DNSSEC=no/unsupported
Current DNS Server: 192.168.0.2
...

# 데비안 패키지 형식으로 다운로드 후 설치
root@forum-vm:~# curl -LO https://storage.googleapis.com/istio-release/releases/1.17.8/deb/istio-sidecar.deb
  % Total    % Received % Xferd  Average Speed   Time    Time     Time  Current
                                 Dload  Upload   Total   Spent    Left  Speed
100 41.4M  100 41.4M    0     0  17.6M      0  0:00:02  0:00:02 --:--:-- 17.6M

root@forum-vm:~# file istio-sidecar.deb
istio-sidecar.deb: Debian binary package (format 2.0), with control.tar.gz, data compression gz

root@forum-vm:~# dpkg -i istio-sidecar.deb
Selecting previously unselected package istio-sidecar.
(Reading database ... 67385 files and directories currently installed.)
Preparing to unpack istio-sidecar.deb ...
Unpacking istio-sidecar (1.17.8) ...
Setting up istio-sidecar (1.17.8) ...

root@forum-vm:~# which pilot-agent
/usr/local/bin/pilot-agent

root@forum-vm:~# pilot-agent version
version.BuildInfo{Version:"1.17.8", GitRevision:"a781f9ee6c511d8f22140d8990c31e577b2a9676", GolangVersion:"go1.20.10", BuildStatus:"Clean", GitTag:"1.17.8"}

root@forum-vm:~# which envoy
/usr/local/bin/envoy

root@forum-vm:~# envoy --version

envoy  version: e1222b5645a29ad3d02b280797ac1219dd88cfbc/1.25.10/Clean/RELEASE/BoringSSL
# istio-agent 는 특정 위치에서 설정 파일을 읽으므로, 복사해둔 파일을 옮기기
root@forum-vm:~# mkdir -p /etc/certs
root@forum-vm:~# mkdir -p /var/run/secrets/tokens
root@forum-vm:~# cp /tmp/root-cert.pem /etc/certs/root-cert.pem
root@forum-vm:~# cp /tmp/istio-token /var/run/secrets/tokens/istio-token
root@forum-vm:~# cp /tmp/cluster.env /var/lib/istio/envoy/cluster.env
root@forum-vm:~# cp /tmp/mesh.yaml /etc/istio/config/mesh
# istiod.istio-system.svc 요청을 istiod 인스턴스로 프록시하는 east-weat 게이트웨이 IP 주소로 정적으로 해석하도록 한다.
root@forum-vm:~# cat /etc/hosts
127.0.0.1 localhost
# The following lines are desirable for IPv6 capable hosts
::1 ip6-localhost ip6-loopback
fe00::0 ip6-localnet
ff00::0 ip6-mcastprefix
ff02::1 ip6-allnodes
ff02::2 ip6-allrouters
ff02::3 ip6-allhosts
192.168.10.200 forum-vm
root@forum-vm:~# echo "192.168.10.10 istiod.istio-system.svc" | sudo sh -c 'cat >> /etc/hosts'
root@forum-vm:~# cat /etc/hosts
127.0.0.1 localhost
# The following lines are desirable for IPv6 capable hosts
::1 ip6-localhost ip6-loopback
fe00::0 ip6-localnet
ff00::0 ip6-mcastprefix
ff02::1 ip6-allnodes
ff02::2 ip6-allrouters
ff02::3 ip6-allhosts
192.168.10.200 forum-vm
192.168.10.10 istiod.istio-system.svc
DNS 프록시는 클러스터 내 호스트네임을 해석해야 한다. 하지만 이 시점에서 사이드카가 아직 컨트롤 플레인에 연결되지 않았다면 파일럿이 알고 있는 DNS 항목이 없을 것이다. 또한 /etc/hosts 에 east-west 게이트웨이 호스트네임을 정적으로 정의하는 것이 독자의 환경에 적합하지 않다면, east-west 게이트웨이를 가리키는 네트워크 로드 밸런서를 설치할 수 있다. 네트워크 로드 밸런서를 설정하고 노출하는 방법은 자신의 클라우드 혹은 온프레미스 환경에 따라 참조하길 바란다.
에이전트를 시작하기 전 마지막 단계는 에이전트가 읽고 쓸 디렉터리에 소유자 권한을 부여하는 것이다.
root@forum-vm:~# cat /etc/passwd | tail -n 3
ubuntu:x:1000:1000:Ubuntu:/home/ubuntu:/bin/bash
lxd:x:999:100::/var/snap/lxd/common/lxd:/bin/false
istio-proxy:x:998:999::/var/lib/istio:/bin/sh

root@forum-vm:~# tree /etc/istio
/etc/istio
├── config
│   └── mesh
├── envoy
│   ├── cluster.env
│   ├── envoy_bootstrap_tmpl.json
│   └── sidecar.env
├── extensions
│   ├── metadata-exchange-filter.compiled.wasm
│   ├── metadata-exchange-filter.wasm
│   ├── stats-filter.compiled.wasm
│   └── stats-filter.wasm
└── proxy

4 directories, 8 files

root@forum-vm:~# chown -R istio-proxy /var/lib/istio /etc/certs /etc/istio/proxy /etc/istio/config /var/run/secrets /etc/certs/root-cert.pem

# start istio
root@forum-vm:~# systemctl status istio
○ istio.service - istio-sidecar: The Istio sidecar
     Loaded: loaded (/lib/systemd/system/istio.service; disabled; vendor preset: enabled)
     Active: inactive (dead)
       Docs: http://istio.io/

root@forum-vm:~# systemctl start istio

root@forum-vm:~# systemctl enable istio
Created symlink /etc/systemd/system/multi-user.target.wants/istio.service → /lib/systemd/system/istio.service.

root@forum-vm:~# systemctl status istio
● istio.service - istio-sidecar: The Istio sidecar
     Loaded: loaded (/lib/systemd/system/istio.service; enabled; vendor preset: enabled)
     Active: active (running) since Sat 2025-05-31 04:12:21 KST; 12s ago
       Docs: http://istio.io/
   Main PID: 1364 (sudo)
      Tasks: 17 (limit: 2272)
     Memory: 33.3M
        CPU: 1.906s
     CGroup: /system.slice/istio.service
             ├─1364 sudo -E -u istio-proxy -s /bin/bash -c "ulimit -n 1024; INSTANCE_IP=192.168.10.200 POD_NAME=forum..."
             ├─1460 /usr/local/bin/pilot-agent proxy
             └─1468 /usr/local/bin/envoy -c etc/istio/proxy/envoy-rev.json --drain-time-s 45 --drain-strategy immediat...
...

root@forum-vm:~# which istio-start.sh
/usr/local/bin/istio-start.sh
root@forum-vm:~# cat /usr/local/bin/istio-start.sh
✔️ 에이전트 로그 확인
이스티오의 에이전트 로그는 다음 두 위치에 기록된다. 표준 출력 채널은 /var/log/istio/istio.log 파일에 쓰여진다. 표준 오류 채널은 /var/log/istio/istio.err 파일에 쓰여진다. 표준 출력 로그를 확인하면 이스티오 컨트롤 플레인으로의 연결이 성공했는지 알 수 있다.
root@forum-vm:~# cat /var/log/istio/istio.log | grep xdsproxy
2025-05-30T19:12:22.138215Z     info    xdsproxy        Initializing with upstream address "istiod.istio-system.svc:15012" and cluster "west-cluster"
2025-05-30T19:12:22.273336Z     info    xdsproxy        connected to upstream XDS server: istiod.istio-system.svc:15012
2025-05-30T19:12:22.278058Z     warn    xdsproxy        upstream [1] terminated with unexpected error rpc error: code = Unauthenticated desc = authentication failure
2025-05-30T19:12:22.644355Z     info    xdsproxy        connected to upstream XDS server: istiod.istio-system.svc:15012
2025-05-30T19:12:22.648302Z     warn    xdsproxy        upstream [2] terminated with unexpected error rpc error: code = Unauthenticated desc = authentication failure
2025-05-30T19:12:22.994113Z     info    xdsproxy        connected to upstream XDS server: istiod.istio-system.svc:15012
2025-05-30T19:12:22.997588Z     warn    xdsproxy        upstream [3] terminated with unexpected error rpc error: code = Unauthenticated desc = authentication failure
2025-05-30T19:12:24.558317Z     info    xdsproxy        connected to upstream XDS server: istiod.istio-system.svc:15012
2025-05-30T19:12:24.561925Z     warn    xdsproxy        upstream [4] terminated with unexpected error rpc error: code = Unauthenticated desc = authentication failure
...

# 만약 로그 파일이 생성되지 않았다면 서비스 시작이 실패한 경우에 그럴 수 있다. 아래 처럼 systemd 로그를 확인하자
journalctl -u istio -f
현재 Istio 구성 요소 중 하나가 제대로 실행되지 않고 있다. 특히 Envoy 프록시가 Istiod (컨트롤 플레인) 와 XDS 인증 오류로 인해 연결을 실패하고 있는 상황이다. 윈도우의 경우 파일 형식이 바뀌는 특징이 있기 때문에 발생하는 문제였다. 따라서 k3s -> local -> vm이 아닌 k3s -> vm으로 파일을 전송해야 한다.
1) 보안 그룹에 k3s와 vm의 public ip 모든 트래픽 허용 설정을 해 준다. 물론 보안 및 테스트에 지장이 가는 설정이므로 완료 후 삭제해 주어야 한다.
2) k3s에 로컬에 있는 pem키를 업로드 한다. vm에 연결하기 위해서이다. 물론 이것도 보안상 문제가 있으므로 완료 후 삭제하는 것을 추천한다.
PS C:\CODE\AWS\key> scp -i ./pandayh7DevOps.pem ./pandayh7DevOps.pem ubuntu@52.78.48.69:/tmp/
pandayh7DevOps.pem                                                                    100% 1678    81.9KB/s   00:00
3) k3s -> vm 실행
(⎈|default:N/A) root@k3s-s:~# scp -i /tmp/pandayh7DevOps.pem /tmp/my-workload-files/cluster.env ubuntu@43.201.253.125:/t
mp/
cluster.env                                                                           100%  635   682.8KB/s   00:00

(⎈|default:N/A) root@k3s-s:~# scp -i /tmp/pandayh7DevOps.pem /tmp/my-workload-files/istio-token   ubuntu@43.201.253.125:
/tmp/
istio-token                                                                           100%  844   884.9KB/s   00:00

(⎈|default:N/A) root@k3s-s:~# scp -i /tmp/pandayh7DevOps.pem /tmp/my-workload-files/mesh.yaml   ubuntu@43.201.253.125:/t
mp/
mesh.yaml                                                                             100%  792   765.1KB/s   00:00

(⎈|default:N/A) root@k3s-s:~# scp -i /tmp/pandayh7DevOps.pem /tmp/my-workload-files/root-cert.pem  ubuntu@43.201.253.125
:/tmp/
root-cert.pem                                                                         100% 1099     1.1MB/s   00:00
4) vm에 istio 재설치
root@forum-vm:~# cat /var/log/istio/istio.log | grep xdsproxy
2025-05-31T04:42:32.561590Z     info    xdsproxy        Initializing with upstream address "istiod.istio-system.svc:15012" and cluster "west-cluster"
2025-05-31T04:42:32.699557Z     info    xdsproxy        connected to upstream XDS server: istiod.istio-system.svc:15012
✔️ 워크로드가 메시에 등록됐는지 확인
워크로드 자동 등록이 활성화돼 있으면, 머신의 istio-agent 가 istiod 에 연결되자마자 WorkloadEntry 가 생성된다.
(⎈|default:N/A) root@k3s-s:~# kubectl get workloadentries -n forum-services
NAME                              AGE   ADDRESS
forum-192.168.10.200-vm-network   11m   192.168.10.200

(⎈|default:N/A) root@k3s-s:~# istioctl proxy-status
NAME                                                    CLUSTER          CDS        LDS        EDS        RDS          ECDS         ISTIOD                     VERSION
catalog-77fdb4997c-jrr9d.istioinaction                  west-cluster     SYNCED     SYNCED     SYNCED     SYNCED       NOT SENT     istiod-d6549b9fc-9xgf7     1.17.8
forum-vm.forum-services                                 west-cluster     SYNCED     SYNCED     SYNCED     SYNCED       NOT SENT     istiod-d6549b9fc-9xgf7     1.17.0
istio-eastwestgateway-86f6cb4699-h795g.istio-system     west-cluster     SYNCED     SYNCED     SYNCED     NOT SENT     NOT SENT     istiod-d6549b9fc-9xgf7     1.17.8
istio-ingressgateway-7b7ccd6454-mxllv.istio-system      west-cluster     SYNCED     SYNCED     SYNCED     SYNCED       NOT SENT     istiod-d6549b9fc-9xgf7     1.17.8
webapp-684c568c59-w4mv9.istioinaction                   west-cluster     SYNCED     SYNCED     SYNCED     SYNCED       NOT SENT     istiod-d6549b9fc-9xgf7     1.17.8
4️⃣ 클러스터 서비스로 트래픽 라우팅
트래픽이 클러스터 서비스로 라우팅되는지 확인하기 위해 가상머신에서 webapp 워크로드로 curl 요청을 보내보자.
# 신규 터미널 모니터링
tcpdump -i any -w - udp port 53 | termshark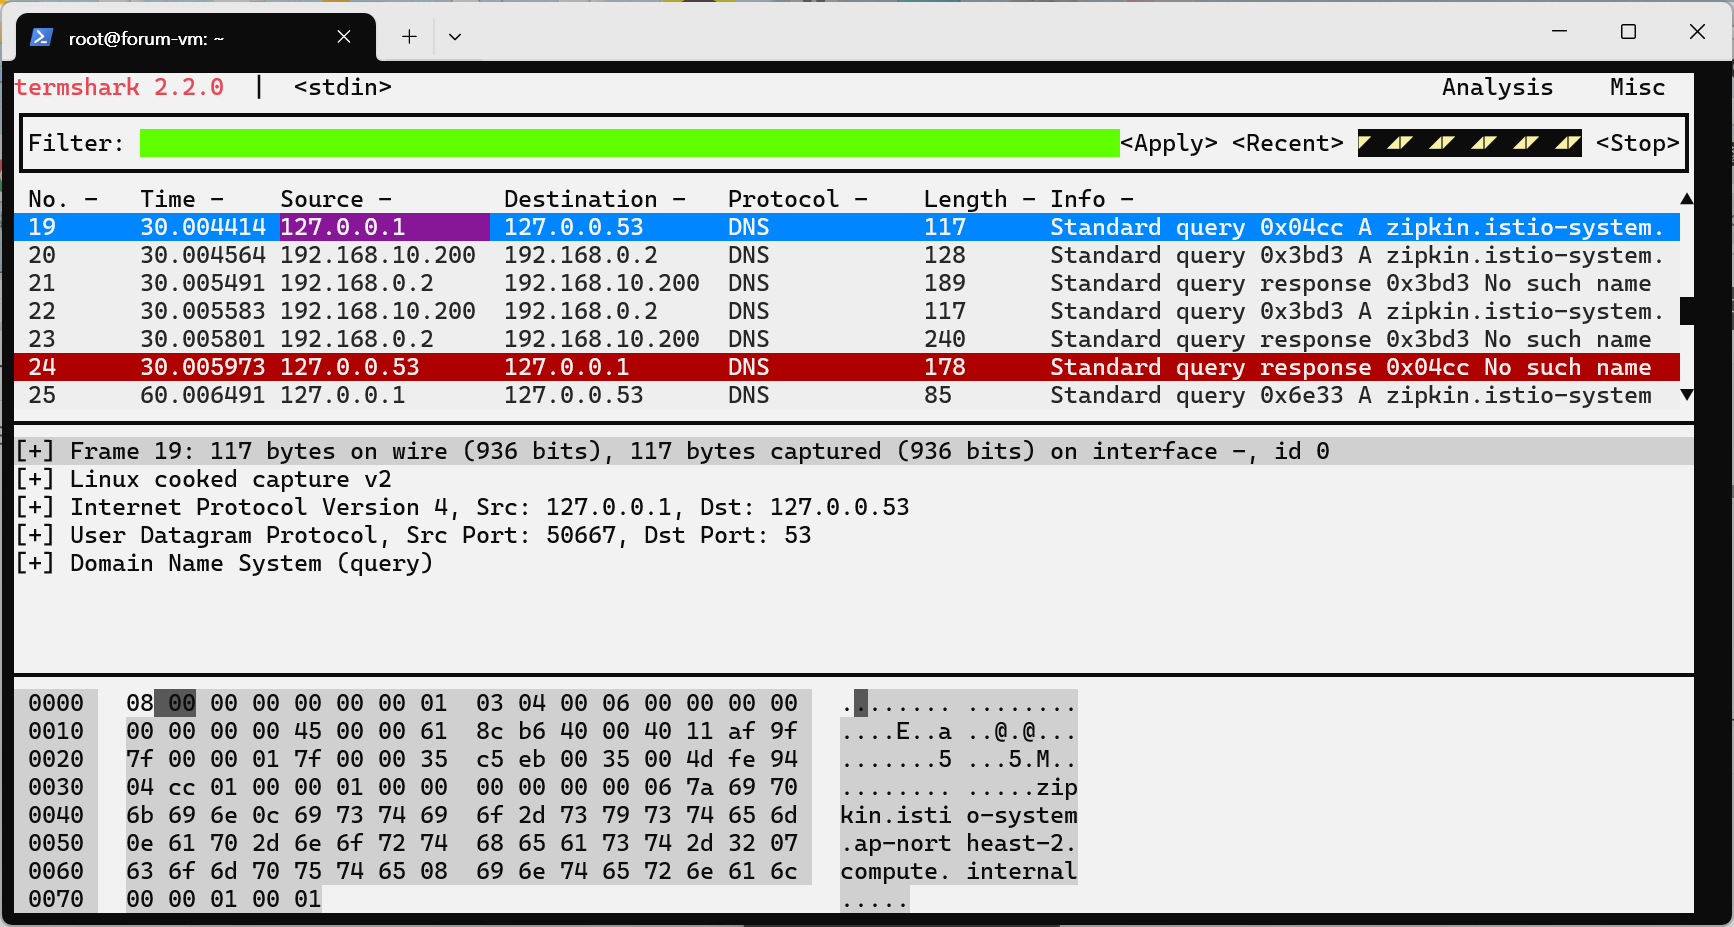
root@forum-vm:~# dig +short webapp.istioinaction
10.10.200.67

root@forum-vm:~# watch curl -s webapp.istioinaction/api/catalog/items/1

# 신규 터미널1
# 15443 연결하는 envoy 프로세스(데이터 플래인) 확인
root@forum-vm:~# watch -d 'ss -tnp | grep envoy'
ESTAB 0      0      192.168.10.200:44282 192.168.10.10:15443 users:(("envoy",pid=8890,fd=40))
ESTAB 0      0      192.168.10.200:45562 192.168.10.10:15443 users:(("envoy",pid=8890,fd=41))
...

# 신규 터미널2
watch -d iptables -t nat -L -n -v
# k3s
(⎈|default:N/A) root@k3s-s:~# kubectl get svc,ep -n istioinaction webapp
NAME TYPE CLUSTER-IP EXTERNAL-IP PORT(S) AGE
service/webapp ClusterIP 10.10.200.67 <none> 80/TCP 3h25m
NAME ENDPOINTS AGE
endpoints/webapp 172.16.0.12:8080 3h25m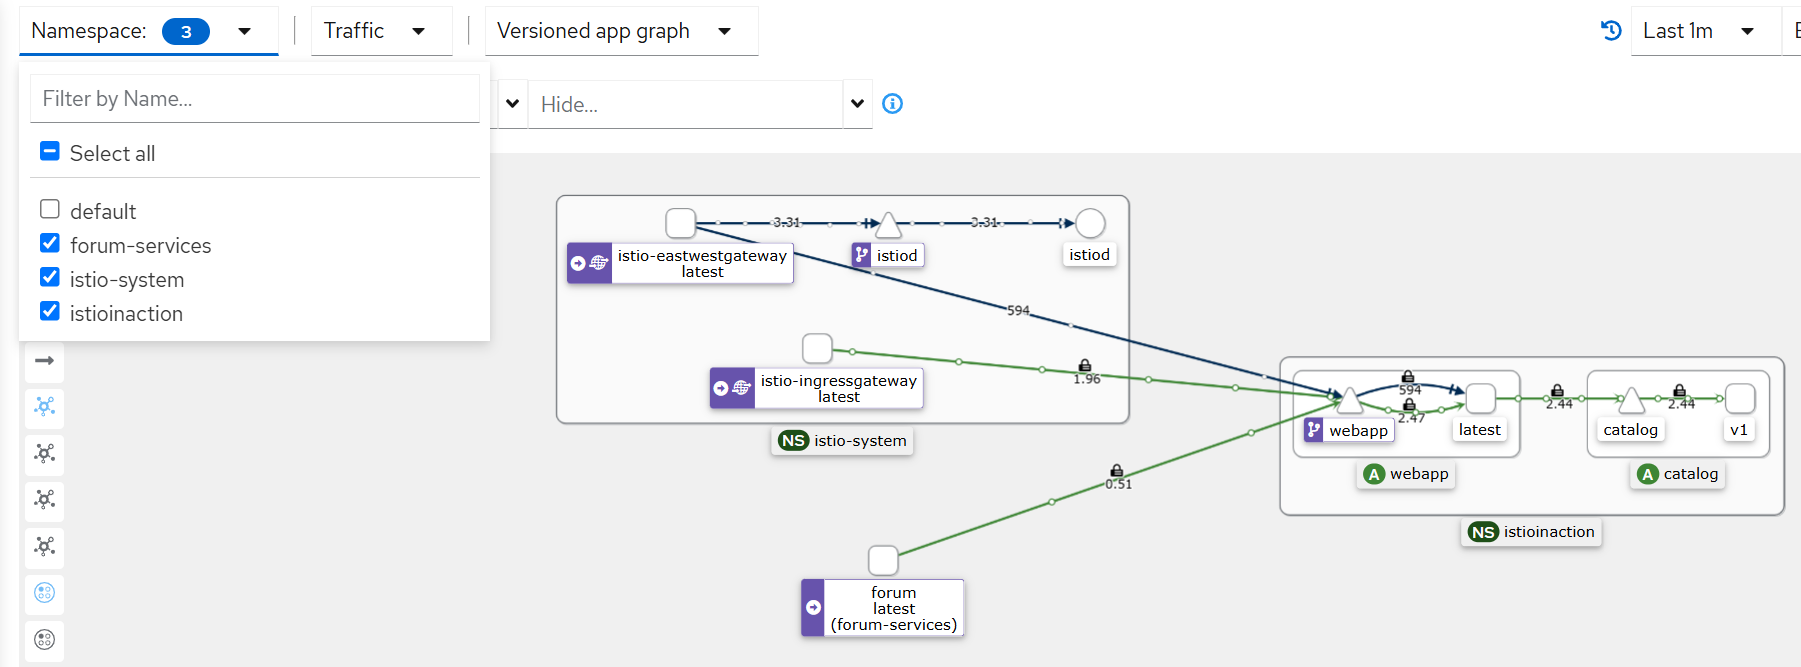
그래프 상 forum이 webapp으로 직접 접근하는 것처럼 보이지만 사실 istio gw로 한 번 갔다가 전달되는 것이다.
✔️ 가상머신에서 요청한 트래픽이 클러스터 서비스에 도달하는 과정
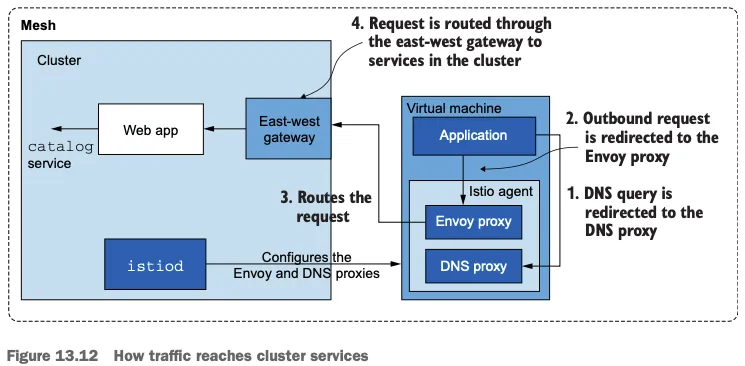
1) 트래픽이 애플리케이션을 떠나려면 먼저 그 호스트네임을 해석해야 한다. 즉, DNS 쿼리가 DNS 프록시로 리다이렉트돼야 한다.
2) 이름이 IP 주소로 해석되면 애플리케이션은 아웃바운드 요청을 시작할 수 있다. 이 요청은 Iptables 규칙이 엔보이 프록시로 리다이렉트한다.
3) 엔보이 프록시는 트래픽을 east-west 게이트웨이로 라우팅한다.
4) east-west 게이트웨이는 요청을 webapp 으로 프록시하고, webapp은 catalog 서비스에 아이템을 쿼리한다.
5️⃣ 트래픽을 WorkloadEntry로 라우팅
머신에서 클러스터 내부/메시 내부 서비스로의 라우팅을 확인했으니 반대로 라우팅하는 것을 확인할 차례다. 즉, 클러스터 안에서 가상머신 워크로드로 라우팅할 것이다.
가상머신에서 실행 중인 서비스로 도달할 때 WorkloadEntry에서 본 IP 주소를 쓰지 않는 이유는 쿠버네티스에서 파드의 IP 주소를 사용하지 않는 것처럼, 플랫폼을 유연하게 유지하고 인스턴스를 교체할 수 있게 하기 위함이다. 쿠버네티스 서비스는 인스턴스를 레이블로 고르며, 이스티오가 모든 서비스를 올바른 IP 주소로 동적으로 설정할 수 있다. 예를 들어 forum WorkloadEntry를 고르려면 다음과 같은 쿠버네티스 서비스를 사용한다.
# cat istio-in-action/book-source-code-master/services/forum/kubernetes/forum-svc.yaml
apiVersion: v1
kind: Service
metadata:
  labels:
    app: forum
  name: forum
spec:
  ports:
  - name: http
    port: 80
    protocol: TCP
    targetPort: 8080
  selector:
    app: forum
(⎈|default:N/A) root@k3s-s:~# kubectl apply -f istio-in-action/book-source-code-master/services/forum/kubernetes/forum-svc.yaml -n forum-services
service/forum created
(⎈|default:N/A) root@k3s-s:~# kubectl get svc,ep -n forum-services
NAME TYPE CLUSTER-IP EXTERNAL-IP PORT(S) AGE
service/forum ClusterIP 10.10.200.150 <none> 80/TCP 18s
NAME ENDPOINTS AGE
endpoints/forum <none> 18s
(⎈|default:N/A) root@k3s-s:~# istioctl proxy-config route deploy/webapp.istioinaction --name 80 -o json
...
{
"name": "forum.forum-services.svc.cluster.local:80",
"domains": [
"forum.forum-services.svc.cluster.local",
"forum.forum-services",
"forum.forum-services.svc",
"10.10.200.150"
],
"routes": [
{
"name": "default",
"match": {
"prefix": "/"
},
"route": {
"cluster": "outbound|80||forum.forum-services.svc.cluster.local",
...
(⎈|default:N/A) root@k3s-s:~# istioctl proxy-config cluster deploy/webapp.istioinaction --fqdn forum.forum-services.svc.cluster.local
SERVICE FQDN PORT SUBSET DIRECTION TYPE DESTINATION RULE
forum.forum-services.svc.cluster.local 80 - outbound EDS
# 아직 결과가 안나옴
(⎈|default:N/A) root@k3s-s:~# istioctl proxy-config endpoint deploy/webapp.istioinaction | grep forum
✔️ forum-vm의 envoy config 확인
root@forum-vm:~# export ISTIOV=1.17.8

root@forum-vm:~# echo 'export ISTIOV=1.17.8' >> /root/.bashrc

root@forum-vm:~# curl -s -L https://istio.io/downloadIstio | ISTIO_VERSION=$ISTIOV sh -

Downloading istio-1.17.8 from https://github.com/istio/istio/releases/download/1.17.8/istio-1.17.8-linux-amd64.tar.gz ...

Istio 1.17.8 download complete!

The Istio release archive has been downloaded to the istio-1.17.8 directory.

To configure the istioctl client tool for your workstation,
add the /root/istio-1.17.8/bin directory to your environment path variable with:
         export PATH="$PATH:/root/istio-1.17.8/bin"

Begin the Istio pre-installation check by running:
         istioctl x precheck

Try Istio in ambient mode
        https://istio.io/latest/docs/ambient/getting-started/
Try Istio in sidecar mode
        https://istio.io/latest/docs/setup/getting-started/
Install guides for ambient mode
        https://istio.io/latest/docs/ambient/install/
Install guides for sidecar mode
        https://istio.io/latest/docs/setup/install/

Need more information? Visit https://istio.io/latest/docs/

root@forum-vm:~# cp istio-$ISTIOV/bin/istioctl /usr/local/bin/istioctl

root@forum-vm:~# curl -s localhost:15000/config_dump | istioctl proxy-config secret --file -
RESOURCE NAME     TYPE           STATUS     VALID CERT     SERIAL NUMBER                               NOT AFTER                NOT BEFORE
default           Cert Chain     ACTIVE     true           287480162042493670801579462241583554405     2025-06-01T04:42:32Z     2025-05-31T04:40:32Z
ROOTCA            CA             ACTIVE     true           188122656057410067011064145456739063129     2035-05-29T04:11:57Z     2025-05-31T04:11:57Z
서비스가 만들어지면 WorkloadEntry 엔드포인트가 선택되고, 이를 사용해 istiod가 데이터 플레인을 설정한다. forum 서비스 요청 시도를 해보자.
(⎈|default:N/A) root@k3s-s:~# istioctl proxy-config cluster deploy/webapp.istioinaction --fqdn forum.forum-services.svc.cluster.local
SERVICE FQDN                               PORT     SUBSET     DIRECTION     TYPE     DESTINATION RULE
forum.forum-services.svc.cluster.local     80       -          outbound      EDS

(⎈|default:N/A) root@k3s-s:~# kubectl logs -n istioinaction deploy/webapp -c istio-proxy -f
# 본인 PC
fish@jellyfish:~$ curl -s -H "Host: webapp.istioinaction.io" http://52.78.48.69:30000/api/catalog/
[{"id":1,"color":"amber","department":"Eyewear","name":"Elinor Glasses","price":"282.00"},{"id":2,"color":"cyan","department":"Clothing","name":"Atlas Shirt","price":"127.00"},{"id":3,"color":"teal","department":"Clothing","name":"Small Metal Shoes","price":"232.00"},{"id":4,"color":"red","department":"Watches","name":"Red Dragon Watch","price":"232.00"}]f
fish@jellyfish:~$ curl -s -H "Host: webapp.istioinaction.io" http://52.78.48.69:30000/api/users -I
HTTP/1.1 500 Internal Server Error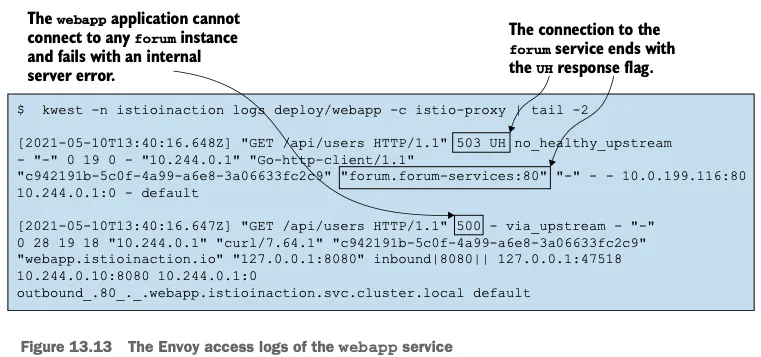
UH 응답 플래그는 ‘정상 업스트림 없음’으로, 클러스터에 트래픽을 라우팅할 수 있는 정상 엔드포인트가 없을 경우에만 나타난다. webapp 에는 forum 서비스의 엔드포인프가 없다는 뜻이다.
✔️ forum 워크로드 상태 확인
WorkloadEntry 의 상태, 좀 더 정확히는 트래픽을 수신할 준비 상태 readiness 를 확인해보자.
(⎈|default:N/A) root@k3s-s:~# kc get workloadentries -n forum-services -o yaml
...
status:
    conditions:
    - lastProbeTime: "2025-05-31T08:48:43.247528123Z"
      lastTransitionTime: "2025-05-31T08:48:43.247528520Z"
      message: 'Get "http://192.168.10.200:8080/api/healthz": dial tcp 127.0.0.6:0->192.168.10.200:8080:
        connect: connection refused'
      status: "False"
      type: Healthy
...

# 아직 8080 서비스가 실행되지 않음
root@forum-vm:~# ss -tnlp | grep 8080
✔️ 가상머신에서 forum 어플리케이션 시작
forum 바이너리를 다운로드하고, 권한을 주고, 8080 포트에서 트래픽을 수신하도록 실행하자.
root@forum-vm:~# ss -tnlp | grep 8080
root@forum-vm:~# wget -O forum https://git.io/J3QrT
--2025-05-31 18:15:39--  https://git.io/J3QrT
Resolving git.io (git.io)... 140.82.113.21
Connecting to git.io (git.io)|140.82.113.21|:443... connected.
HTTP request sent, awaiting response... 301 Moved Permanently
Location: https://github.com/istioinaction/book-source-code/raw/master/services/forum/forum-linux-amd64 [following]
--2025-05-31 18:15:40--  https://github.com/istioinaction/book-source-code/raw/master/services/forum/forum-linux-amd64
Resolving github.com (github.com)... 20.200.245.247
Connecting to github.com (github.com)|20.200.245.247|:443... connected.
HTTP request sent, awaiting response... 302 Found
Location: https://raw.githubusercontent.com/istioinaction/book-source-code/master/services/forum/forum-linux-amd64 [following]
--2025-05-31 18:15:40--  https://raw.githubusercontent.com/istioinaction/book-source-code/master/services/forum/forum-linux-amd64
Resolving raw.githubusercontent.com (raw.githubusercontent.com)... 185.199.108.133, 185.199.109.133, 185.199.111.133, ...
Connecting to raw.githubusercontent.com (raw.githubusercontent.com)|185.199.108.133|:443... connected.
HTTP request sent, awaiting response... 200 OK
Length: 7555365 (7.2M) [application/octet-stream]
Saving to: ‘forum’

forum                         100%[=================================================>]   7.21M  --.-KB/s    in 0.03s

2025-05-31 18:15:41 (224 MB/s) - ‘forum’ saved [7555365/7555365]

root@forum-vm:~# file forum
forum: ELF 64-bit LSB executable, x86-64, version 1 (SYSV), statically linked, Go BuildID=trQtLS4PXPBMx2f_5fvT/FjJvgMs4NbpPqqnG_oas/gHZZYnBj4Z8pFLRo0xzI/a8toFDYJMxdaqdJV2Cex, not stripped

root@forum-vm:~# chmod +x forum

root@forum-vm:~# ./forum
Server is listening in port:8080
root@forum-vm:~# curl http://localhost:8080/api/healthz -v
* Trying 127.0.0.1:8080...
* Connected to localhost (127.0.0.1) port 8080 (#0)
> GET /api/healthz HTTP/1.1
> Host: localhost:8080
> User-Agent: curl/7.81.0
> Accept: */*
>
* Mark bundle as not supporting multiuse
< HTTP/1.1 200 OK
< Date: Sat, 31 May 2025 09:16:49 GMT
< Content-Length: 0
<
* Connection #0 to host localhost left intact
root@forum-vm:~# ss -tnlp | grep 8080
LISTEN 0 4096 *:8080 *:* users:(("forum",pid=103540,fd=3))(⎈|default:N/A) root@k3s-s:~# istioctl proxy-config endpoint deploy/webapp.istioinaction --cluster 'outbound|80||forum.forum-services.svc.cluster.local'
ENDPOINT STATUS OUTLIER CHECK CLUSTER
192.168.10.200:8080 HEALTHY OK outbound|80||forum.forum-services.svc.cluster.local
(⎈|default:N/A) root@k3s-s:~# kc get workloadentries -n forum-services -o yaml
...
status:
conditions:
- lastProbeTime: "2025-05-31T09:16:38.634407549Z"
lastTransitionTime: "2025-05-31T09:16:38.634407798Z"
status: "True"
type: Healthy
...
이제 다시 PC에서 요청 해 보자.
fish@jellyfish:~$ curl -s -H "Host: webapp.istioinaction.io" http://52.78.48.69:30000/api/users
[{"id":1,"name":"Leanne Graham","username":"Bret","email":"Sincere@april.biz","address":{"street":"Kulas Light","suite":"Apt. 556","city":"Gwenborough",
...

# 연속 접근
fish@jellyfish:~$ while true; do curl -s -H "Host: webapp.istioinaction.io" http://52.78.48.69:30000/api/users ; echo; d
ate; sleep 1; done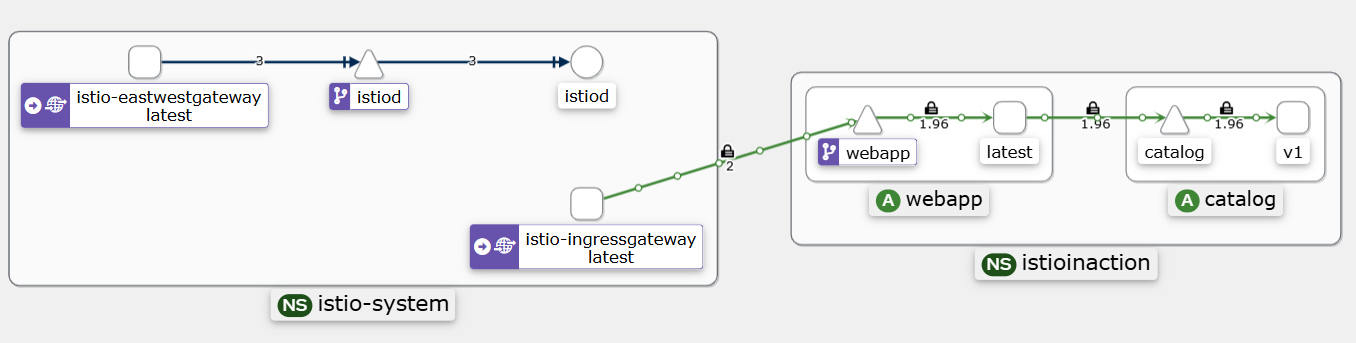
이렇게 클러스터 서비스에서 WorkloadEntry 로의 트래픽 흐름을 검증했다. 또한 이스티오가 어떻게 트래픽을 받을 준비가 되지 않은 워크로드로 트래픽을 보내지 않는지도 보여줬다. 단순히 데이터 플레인에 그 엔드포인트를 설정하지 않는 것이다. 이 예제에서는 그 이점이 잘 드러나지 않았을 수도 있지만, 운영 환경 클러스터에서는 이런 방식이 클라이언트가 오류를 반환하는 인스턴스로 트래픽을 보내는 것을 방지하고 그 대신에 정상 인스턴스만 라우팅하게 된다.
6️⃣ 컨트롤 플레인이 가상 머신 설정 : 상호 인증 강제
가상머신이 메시에 통합되어 사이드카 프록시가 네트워크 트래픽을 관리하므로, 이스티오의 풍부한 기능을 가상머신에 적용할 수 있다. 이를 시연하기 위해, 트래픽 상호 인증을 강제하는 PeerAuthentication 을 만들어 보안을 강화해보자.
지금은 가상머신의 8080 포트를 노출해뒀기 때문에 연결할 수 있은 사람은 누구나 요청을 처리할 수 있다. 메시에 통합되지 않은 로컬 컴퓨터에서 가상머신으로 요청을 보내 이를 확인해볼 수 있다.
fish@jellyfish:~$ curl -is 43.201.253.125:8080/api/users | grep HTTP
HTTP/1.1 200 OK
요청이 처리됐다. 예상한 바이지만, 앞으로는 금지할 것이다. 그러기 위해 메시에 상호 인증 트래픽만 처리하는 메시 범위 정책을 설정할 것이고, 그 결과로 서비스를 무단 접근으로부터 보호할 것이다.
# cat istio-in-action/book-source-code-master/ch13/strict-peer-auth.yaml
apiVersion: security.istio.io/v1beta1
kind: PeerAuthentication
metadata:
  name: default
  namespace: istio-system
spec:
  mtls:
    mode: STRICT

(⎈|default:N/A) root@k3s-s:~# kubectl apply -f istio-in-action/book-source-code-master/ch13/strict-peer-auth.yaml
peerauthentication.security.istio.io/default created

(⎈|default:N/A) root@k3s-s:~# kubectl get peerauthentication -A
NAMESPACE      NAME      MODE     AGE
istio-system   default   STRICT   39s
정책이 데이터 플레인에 배포될 때까지 잠시 기다리자. 그런 다음, 상호 인증되지 않은 트래픽이 금지됐는지 본인의 PC에서 확인한다.
fish@jellyfish:~$ curl -is 43.201.253.125:8080/api/users -v
*   Trying 43.201.253.125:8080...
* Connected to 43.201.253.125 (43.201.253.125) port 8080 (#0)
> GET /api/users HTTP/1.1
> Host: 43.201.253.125:8080
> User-Agent: curl/7.81.0
> Accept: */*
>
* Recv failure: Connection reset by peer
* Closing connection 0

# istio-ingressgateway 경유 요청
fish@jellyfish:~$ while true; do curl -s -H "Host: webapp.istioinaction.io" http://52.78.48.69:30000/api/users ; echo; d
ate; sleep 1; done
[{"id":1,"name":"Leanne Graham","username":"Bret","email":"Sincere@april.biz","address":{"street":"Kulas Light","suite":"Apt. 556","city":"Gwenborough","zipcode":"92998-3874"},"phone":"1-770-736-8031 x56442","website":"hildegard.org","company":{"name":"Romaguera-Crona","catchPhrase":"Multi-layered client-server neural-net","bs":"harness real-time e-markets"}},{"id":2,"name":"Ervin Howell",
...
출력을 보면 webapp의 요청이 처리됐는데, 이는 가상머신이 컨트롤 플레인이 적용한 설정을 준수함을 보여준다. PeerAuthentication 정책은 하나의 예시일 뿐이다. 비슷하게 모든 이스티오 API를 사용해 가상머신의 프록시를 설정할 수 있다.
'Istio' 카테고리의 다른 글
| Istio Traffic Flow (1) | 2025.05.31 |
|---|---|
| DNS 프록시 이해 (0) | 2025.05.31 |
| 가상머신 인프라 준비하기 (AWS EC2 K3S) (0) | 2025.05.31 |
| 이스티오의 가상머신 지원 (3) | 2025.05.28 |
| 루아와 웹어셈블리로 이스티오의 데이터 플레인 확장하기 (4) | 2025.05.25 |


